Problem Definition
For the fourth programming assignment, there were multiple goals. The first part of the assignments goal was to perform segmentation of the hands in image frames from a pianist playing piano. The segmentation task is particularly difficult because the hands are often in shadows and cannot be identified just through skin color thresholding. The second and third part of the assignment focuses on tracking. The second part provides segmentation and localization of flying bats in ~151 image frames. The goal is to perform tracking of the bats throughout the frames. Similarly, for the third part with the cell data, the goal is to perform tracking but the segmentation and localization of the cells needed to be performed first.
Method and Implementation
For the first part with the piano, I first segmented/cropped the image to the central area of most change. I did this automatically by continuously differencing the images until only one image was left. I binarized the image and found a bounding box for the area with the most white pixels as that would be the area with hand/body/piano movement. This cropped it down to a significantly smaller search region.
Then, I performed skin thresholding and erosion and dilation (i.e. opening) of the cropped portion. This wasn't enough to find the hands - so I had to be creative. I further cropped the region by finding the first black pixel in the first row - this was where the first row of pixels on the piano ended. I cropped it further to this spot to try to only include the hands and piano pixels. What now remained was essentially the parallelogram of the piano, the hands over it, and maybe some extra space to the right.
I decided to find the hands by actually finding the shadows they created on the piano. I took a middle column of the remaining cropped region that hypothetically should cross through all keyboard keys and the hands, and looked for transitions of white to black pixels: this signified the hand and the hand's shadow on the piano. I then made bounding boxes slightly above these found pixels. The performance is surprisingly good. I printed out some intermediate steps in the code- note that the display is in BGR of the final result, but it is written to file as RGB. The results are shown below.
For the bat tracking, I used the localization given. I joined the locations in the first two frames to initialize tracks so that the beginning kalman predictions could be performed. I originally had the idea of having "current" vs. "terminated" tracks, but I could not figure out how to properly incorporate it so I stopped and only add to "current" in the code.
Simple algorithm ideas: there are three cases for the tracker-
1) The amount of existing tracks is equal to the number of bats in the next frame: greedily assign each track to a bat in the next frame by minimizing the distance between the the track's kalman prediction for the next frame and the next frame bat locations.
2) The amount of existing tracks is less than the number of bats in the next frame: do the same as above until we run out of tracks. Initialize new tracks for the remaining bats that have yet to be assigned.
3) The amount of existing tracks is more than the number of bats in the next frame: assign the bats to the tracks in the same greedy fashion above. I tried adding their kalman prediction to smooth the tracks so that every track has 151 points thinking maybe it would improve the future matching, but I thought my results were worse or more confusing in the visualization actually. We could also terminate some tracks and remove them from the options to keep adding bat locations too.
These rules make some naive assumptions such as: if the # of tracks = # bats in the next frame, this assumes they're the same bats. Maybe we could add a maximum distance threshold that requires a new track be made if the bat is too far away to truly belong to a current track. At the end of the file, I draw the trajectories. They seem reasonable for the first 10-20 time steps but become messing after.
The third part for the cell segmentation, localization, and tracking is described below:
Detection. We used thresholding and closing to detect the cells on each frame. Since the cells themselves have the intensity that is almost indistinguishable from the background intensity, we decided to detect the halo around the cells instead. We then removed the noise using the combination of closing operation and elimination by the object size. Then, we labeled each object and used those labels for tracking.
Tracking. Our tracking method is based on the OpenCV Multitracker that is basically a set of trackers (in our case it is Discriminative Correlation Filter with Channel and Spatial Reliability[1] or CSRT), each of them tracks one cell. The CSRT learns a set of filters that represent the object and uses them to find the most correlated point in the proximity of the position of the track on the previous frame. We used our labeling results to initialize the trackers. Despite its overall decent accuracy in case when objects do not change their appearance and shape much, pure CSRT fails on the cell dataset since cells might stretch or shrink significantly. CSRT also does not handle cell division since it only keeps track of the objects predefined during the initialization. Knowing that, we used the detection results to keep assist the multitracker: for the bounding box predicted by the CSRT multitracker, we found the most covered object within it and removed this object from the list of found objects. After we have processed all the trackers, we look through all the unassigned objects and create new tracks for them. If no objects are located in the bounding box or if the bounding box lies within another bounding box (this might happen if one cell is segmented as two), we skip this track for the frame.
Results
The resulting piano hand segmentation is shown below. In the first column we have the image cropped from image differencing down to the area of most movement. The second image shows the further cropped image by thresholding and narrowing down to the piano area even further. Finally, we see the bounding boxes around the hands that are the result of finding the hand shadows and approximating the hand location from them.
Piano Segmentation Examples | ||
| Masked Piano Cropped | Final Segmentation | |
 |
 |
|
 |
 |
|


The resulting bat tracks are shown below at the beginning (relatively simple tracking) and end of the video frames (i.e. after 10 frames and after 150 frames).
| t = 10 | t = 150 |
 |
 |
A cell tracking example is shown below for succeeding frames. The tracks are represented by bounding boxes of the same color.
| Image Type | Current Frame | Next Frame | Original |  |
 |
| Thresholded |  |
 |
| Simple tracker | |
|
| Greedy tracker w Kalman |  |
 |
Discussion
1) Show your tracking results on some portion of the sequence. In addition to showing your tracking results on an easy portion of the data, identify a challenging situation where your tracker succeeds, and a challenging situation where your tracker fails.
The results are shown above. The tracking becomes difficult when bats fly extremely close to each other, as the greedy decision becomes more ambiguous and the kalman prediction may not necessarily distinguish the two from each other either. Generally, it is difficult when objects become very close to each other (same holds for the cells). Another issue that rises is how to deal with objects entering and exiting the frame. This depends a lot on the dataset and what reasonable assumptions can be made about the objects (i.e. if a bat flies out of the frame does it mean it never returns? how many total bats should there be?).
2) How do you decide to begin new tracks and terminate old tracks as the objects enter and leave the field of view?
New tracks begin whenever there are more bats than current tracks. If there are more bats than tracks, the ones not added to could potentially be terminated.
3) What happens with your algorithm when objects touch and occlude each other, and how could you handle this so you do not break track?
The algorithm does not distinguish objects well when two objects touch and occlude each other. This could be handled by not terminating unmodified tracks immediately but terminating them after some threshold of frames not being updated. This would give these tracks the chance to find the bat again in the succeeding frames.
4) What happens when there are spurious detections that do not connect with other measurements in subsequent frames?
It is disruptive to the drawn tracks and can make chaotic trajectories. Depending on the number of tracks and bats at the given time, it may result in new tracks and won't negatively influence current tracks.
5) What are the advantages and drawbacks of different kinematic models: Do you need to model the velocity of the objects, or is it sufficient to just consider the distances between the objects in subsequent frames?
It isn't really sufficient to just consider the distances between objects in subsequent frames, as shown by the bat data. When there are a lot of near-by objects it is important to know where they are expected to go (from the modeled velocity of the objects/their kalman predictions) in order to correctly track objects that pass each other or are just very close to each other.
Acknowledgements
I would like to acknowledge the following resources which aided me in the completion of this assignment: Kalman Filter implementation in Python, Tracking with Kalman Filters
Assignment 3
CS 585 HW 3
Andrea Burns
10/9/18
Problem Definition/Overall Description
The purpose of this assignment is to properly identify hand gestures or movements through images features we have learned about in class such as circularity measures, image differencing, skin color thresholding and more. Template matching is also a requirement for this assignment. I wanted to use a mixture of techniques so for the four gestures I am identifying, I decided to narrow down the template matching with first computing circularity by computing compactness. I noticed that the fist gesture/hand shape would be the most compact of the gestures I would identify with my program (fist, open hand, peace sign, okay symbol), so I thought it would be interesting to see how this method would perform and compare to template matching. If the computed compactness is in the range considered 'compact enough' then it is automatically labeled a fist shape. This is computed with contours from findContours opencv method. If the contours are not compact enough, the image will go to the template matching method. All templates are looped through and resize the image until a maximal match is found, and a bounding box is drawn and labeled with the corresponding shape of the template. Also note that the template matching is performed with the Canny edges of the hands to try to be robust to skin color differences and slight changes in orientation or shape.
Graphics Description
For the fist gesture, I thought it would be most interesting to see the contours that determined the compactness of the shape - this would also lead to further interpretability of the results in the cases other gestures were misclassified as fists. These contours hug the hand. In the case of template matching, I draw a bounding box of the region that was determined to be the matching section of the image. This also helps interpret gestures that are misclassified, as it shows what the template matching focused on and may explain misunderstandings of similar structure or shadows, for example. In either case, the centroid of the object is labeled with the supposed matching shape for clarity. I also print out the compactness so that we can see how it changes based on shape.
Results
Results | ||
| Detected Shape | Result Image | |
| Peace Sign |  |
|
| Fist |  |
|
| Open Hand |  |
|
| Okay Symbol |  |
|
Precision is defined as the true positives over the true positives plus false positives:
Discussion
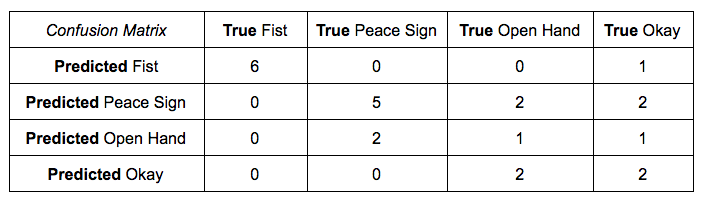
It seems the precision of the gestures goes down across the gestures listed above. There seems to be a decent amount of confusion between the more complicated hand gestures (as in those other than the fist), which makes sense due to their similarity. The two fingers in the peace sign and the three fingers in the okay symbol are all a part of the open hand structure, so it makes sense that they would be confused, and this was properly displayed in some of the misclassified cases' bounding boxes. I also noticed that sometimes there were excessive contours that lead to misleading template matching. Generally, it seems the quality of the templates was far superior to those of the actual images taken of different hands as there was variable lighting and image quality.
Conclusions
It seems that gesture recognition is a much more difficult task than it first appeared. Again, it seems that image preprocessing can go a long way in the influence it has over the results as it would directly impact the contours or edges used in computing compactness and the template matching.
Credits and Bibliography
I would like to acknowledge the following resources, which aided me in properly using template matching: Open CV Template Matching and Multi-scaled Template Matching
Assignment 2
CS 585 HW 2
Andrea Burns
Reuben Tan
9/26/18
Problem Definition
For this assignment, the goal was to implement algorithms discussed in class regarding border following, color detection, and shape detection. Initially, we need to identify which color is the background of the image. Once we have done this and identified the colors of the other shapes in the image, we must label each blob and then find its border. After, we check which parts of the border are against the background and which are touching other shape blobs. Lastly, for each blob we decide which shape it is.
Method and Implementation
First, we implemented a method to detect the background color. At first, we tried to define the background color by finding the color which has the maximum number of pixels in the image. However, this approach does not always work because if there are many shapes in the image the background color may not actually be the majority color value. Instead, we take the maximum color of the bordering pixels of the image, which tends to work better, as few or none of the shapes border the image (typically).
Next, we have methods to mask according to the background color or the shape colors, which is how we identify/label each shape. We can use thresholds to do this and use kmeans clustering to help clean the data as it did not have pure pixel values. Another helper method we made was to option the N8 neighboring pixels, which will later be used in our border following algorithm. We also have a helper to draw the boundary pixels as blue.
The border following algorithm is as defined in class, and can we viewed here: border following alg.
The last two methods we implemented were to classify the border pixels (against background or against other shape) and to recognize the shape (circle, square, triangle). For the classificaiton of the border pixels, we take in the image masked to the background and check for every border pixel if its eight neighbhors are touching the background color of the mask or the other shapes, and label accordingly. For the shape detector, we calculate the arc length and then use this in the opencv functionapproxPolyDP. This function returns the shape according to how many vertices it finds. The rest of the code is simply to read and write images/call the other functions.
Experiments
We ran our code on approximately 80-100 of the images. Some labeled and bordered images are shown below over the original images to show that our results are accurate. They first show the objects have been correctly identified by displaying their centroids, the masked version, and then the general border following algorithm works, with the outlines in red.
PLEASE NOTE: You may need to zoom into the border-labeled images in the results section to see the green, blue, or red outlines, it is small but they are there!
Examples | ||
| Bounded | Mask | Labeled Image |
 |
 |
 |
 |
 |
 |
 |
 |
|
 |
 |
|
Results
Below are some examples of our results for border classification and shape classification. We state below the output of the shape detector under the first column. These are some example of poorly detected shapes. There seems to be a lot of confusion between circles and other shapes, but as you can see from the confusion matrix below, squares and triangles are often properly classified, with precisions .9136 and .8101, respectively. Overall accuracy computed is .69, which is primarily skewed by the circle class, unfortunately.
Results | ||
| Detected Shape | Source Image | Result Image |
| Circle |  |
 |
| Circle |  |
 |
| Circle |  |
 |

Precision is defined as the true positives over the true positives plus false positives:
Discussion
Discussion of method and results:
- What are the strengths and weaknesses of your method? The strengths of the background method is that it does not rely on counting all pixels in an image, which is faster. Additionally, the background might not always be the majority color of an image, so this way counteracts that problem as well. The border following algorithm implemented from class is nice because it is easily intepreted and understood, but it does not handle certain cases well or less clean data. It could not handle small edges resulting from poor thresholding/masking, so erosion and swelling was necessary to fix this problem. Additionally, it cannot handle when shapes are bordering the image, so we tried to avoid this by adding 1px padding to the entire image. Yet, this caused other failures and ultimately did not fully fix the problem. Therefore, there were both strengths and weaknesses to all of our methods as the data turned out to be impure and difficult to work with. Lastly, the shape detector seemed to often misinterpret a circle as a square (and not vice versa), which is peculiar. Generally the classification of squares and triangles was very successful. It seems like the shapes were more poorly identified when they were partially blocked by other shapes too.
- Potential future work. How could your method be improved? What would you try (if you had more time) to overcome the failures/limitations of your work? If there was more time, we would like to look into bigger solutions to some of the edge cases involved in the border following algorithm. Additionally, we could try different shape detector ideas.
Conclusions
Based on my discussion, important takeaways are that data cleaning can really impact the quality of your results and the edge cases that appear in algorithms. I would not have thought we would have run into so many issues, but it's because the border following algorithm at first glance/definition doesn't describe the difficult edge cases, which actually occurred a lot in this dataset.It was also interesting to see how the code would behave or fail depending on shape placement and similarity of colors. Additionally, all of the code really depended on the border following algorithm, so when that failed, everything else did!
Credits and Bibliography
I would like to thank Reuben Tan for his excellent partnership on this assignment. He's a great teammate.
Assignment 1
CS 585 HW 1
Andrea Burns
9/12/18
Problem Definition
For this assignment, we needed to familiarize ourselves with opening and editing images using OpenCV. This included opening images, transposing them, and editing the image to be black and white or blurred.
Method and Implementation
Three methods were written: one to convert images to grayscale, one to transpose an image, and the last to blur the image. For turning the image to grayscale, I took the maximum value of the RGB values to be the new singular pixel value in the B&W image, which was one of the conversion methods discussed in class. For the transpose method, I zipped together each of the columns of the image. This is equivalent to making a new array of the first pixels of each row, the second pixels of each row, ... and so on until the nth pixel. Each of these new arrays becomes a row in the new image, which is essentially transposing it. Lastly, for blurring, I averaged the value of all pixels within a 2 by 2 box.I wanted to making the blurring noticeable so I added an additional for loop to repeat the averaging 20 times.
Experiments
The above methods have been applied to an image of my face and the resulting images are shown below.
Results
Results | ||
| Trial | Source Image | Result Image |
| Black & White |  |
 |
| Transposing | |
|
| Blurring | |
 |