You need to install both Eclipse SDK 3.2 and JDK (Java Development Kit).
Here we provide a very simple guide through the installation process. It may be helpful to read other sources also. You can find some on the same pages from where you will go to download the required files. Take a look at them, as they give more details with respect to the particular platforms and versions.
Before you start the installation, make sure that you have logged on your machine with administrator rights.
To install JDK (Java Development Kit) follow the steps:
- Go to the Sun downloads web-page: http://java.sun.com/javase/downloads/index.jsp
- Download JDK 5.0 Update 8 (this file is executable)
- Run the file. It will start a installation wizard.
- Choose Typical installation (it usually is set to typical by default).
To install Eclipse SDK 3.2 follow the steps:
- First, you need to copy a compressed
file on your machine. You can do this in 2 ways (second is
shorter):
- Go to Eclipse's official site http://www.eclipse.org/ . There is various information there. Follow the link on the upper right picture of the Eclipse logo and then follow the 'Download Eclipse 3.1' link.
- Go directly to the download page:
http://download.eclipse.org/eclipse/downloads/drops/R-3.2-200606291905/index.php .
- Choose Eclipse SDK
suited for your platform (Windows/Unix...). For
example, for Windows you need to download
eclipse-SDK-3.2-win32.zip . - Choose a mirror for
- Save the compressed file to any location you choose, for example c:\Program Files
- Decompress the file by double-clicking on it which should invoke your decompression program. If you do not already have one such program installed, you can install one for free such as WinZip. Extract the contents of the zipped file to your c:\Program Files directory.
Now the installation is compete.
Start Eclipse by
double-clicking eclipse.exe
in the c:\Program Files directory. The
first time you open Eclipse, you will
be asked to choose
the root for your workspace. The workspace is where Eclipse
will
save all your files. Therefore, before
you start it, it is better to decide where you want your workspace to
be.
Create a workspace directory, for example, c:\code on your Windows personal system or Z:\code in the Windows
lab systems or
home/username/code (under Unix).
Then start Eclipse. Note that
the workspace does not depend on where Eclipse
is located. You can choose any directory you want, in the lab
machines this directory should be in Z:\.
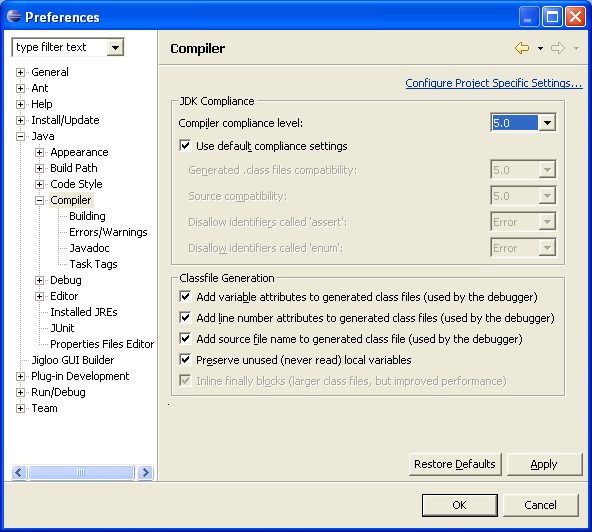
Note that you want to be sure that eclipse is set to the correct
java compliance: go to window->preferences->expand
java->compiler and make sure that the "compiler compliance level
is set to 5.0". See image:
If you want to make a shortcut to eclipse on your desktop so that you can start it up quicker, find the eclipse file in the eclipse folder in your Program Files and right click on it. Choose "create shortcut on Desktop".
Installing SSH:
If you are working from home, often it is useful to transfer files that we created in lab to your home machine, so that you can work off of those. Here we will discuss how to how do accomplish this using ssh, the "Secure Shell". Generally, ssh can be used to transfer files from your home machine to csa (CS computer), or from csa to your home machine.
- Download the ssh program.
- Install the program on your computer by double clicking on the file you just downloaded.
- Start Ssh Transfer Client (you can do this through your "Program Files" directory).
- Once the program starts, it should look like the following image
where all of the information on the left window is the items on your
desktop:

In ssh, the left window represents the computer that you are on (that you are sitting at), and the right (which is probably blank when you first start) represents the computer that you are trying to remotely access (such as csa.
- You now want to tell ssh which remote computer you wish
to
connect to and transfer files to and from. You do this by clicking
the "Quick Connect" button. In our case, we want to connect from a
home machine to the CS computers, so we will type in
"csa3.bu.edu" for the host, and your login name for the login.
Hit enter and it should prompt you to enter your password.

- Once you have successfully connected, the pane on the right will contain a white background and some files and folders, such as those created in lab. The files and folders in the right pane are those files on the CS computers. You can transfer files from the CS computers to your home computer by dragging and dropping them from the right pane to the left (your home computer). You can transfer files from your home computer to the CS computers by dragging and dropping from the left pane to the right.
Page Created by: Ching Chang
Page Updated by: Gabriel Parmer
Last updated: 1/23/06