Assignment 0, Review of HTML and CSS, and HTML Forms
This assignment might be a review of material you already know, or it might be new to you. Either way, you must be competent in this material before you begin working on assignment 1.
It is not due for submission and will not be graded.
Preliminaries
If you have questions while working on this assignment, please post them on Piazza! This is the best way to get a quick response from your classmates and the course staff.
Learning Objectives
After completing this assignment, students will be able to:
-
Write a static HyperText Markup Language (HTML) file, and test its display within in a web browser.
-
Format HTML pages using Cascading Style Sheets (CSS) to modify the look and feel of an HTML document.
-
Publish a static web page to the public World-Wide Web (WWW).
-
Create an HTML form to collect inputs via a Web Browser.
-
Implement each of these form input elements: text box, radio buttons, check boxes, drop-down list.
-
Submit an HTML form, and have it’s results processed by a web application (you will write such a web application in a later assignment).
-
Use CSS to beautify your web page and HTML form(s).
Task 1: A Personal-Presence Web Page
In this task, you will become familiar with HTML encoding, which is crucial to display content on the Web. You will write and test a simple web page, and verify that it displays correctly in your web browser locally on your comptuer.
Use VS Code to create a new HTML file, and save it with the special name index.html.
The web server looks for this special filename and will load this page by default at
your public URL.
Developing a web page should be an iterative process. Test as you go, i.e., write a small section, and then test your web page by opening/reloading it in your browser locally.
-
Repeat this process as you develop the web page, making changes as you go based on how it looks in the web browser.
-
Get in the habit of using Chrome’s Developer Tools to help debug individual sections, especially for formatting issues.
As you develop your web page, get in the habit of including comments to explain each major section, and make notes to explain anything that is confusing.
Develop a personal presence web page (i.e., “about you”) with the following elements:
-
An
<h1>heading on the page should display your name. -
A table consisting of one row with two columns, with the following layout:
-
On the left-hand side, a picture of yourself with a width of 400 pixels. The height should be constrained to keep the correct proportions with this width.
-
On the right hand side, display your name, class year (e.g. class of 2025), and major.
-
-
A “Short Bio” section. Begin with an
<h2>heading, followed by a short biographical paragraph (approximately 50 words), which should tell readers about where you grew up and what you are studying here at BU. -
An “Activities and Interests” section. Begin with an
<h2>heading, followed by a table displaying at least 3 of your activities/interests. The table should contain one row with four columns for each activity:-
an image related to the activity/interest; make this image display with width of 300 pixels.
-
an
<h3>heading to identify the activity -
a short paragraph (approximately 25 words) with a description of the activity, and your involvement in this activity/interest.
-
one or more links to organization(s) or group(s) with which you do these activities.
-
-
Create a file called
styles.css, which will contain a Cascading Style Sheet. Link this style sheet into the<head>section of your HTML file.Use this CSS file to customize the presentation of the web page to make it visually appealing. You have a lot of discretion in this regard, so long as you do not use the default colors (e.g., black text on white background). The goal is to experiment with using a CSS file to control the look and feel of the web page.
Customize the following elements: background color, foreground color(s), heading font style/size, paragraph font style/size, etc., link colors/styles, text alignment, margin, and padding.
These are the minimal requirements; you may add any additional information or customization that you wish.
Task 2: Publishing Your Web Page
In this task, you will publish your web page to the public World-Wide Web on our cs-people webpage webserver.
Pre-requisite Task: Setting up your Web Space
The CS Department automatically creates CS Unix accounts for all students who are
registered for a CS class. The Department maintains a web server called cs-people.bu.edu.
Set up your cs-people webpage Web Space (public_html directory)
If you have done this before, you may skip this part.
In order to publish web pages on this server, you must run a short script to activate
your account and set the permissions correctly. You will need to connect to the host
csa2.bu.edu. Here’s how:
- Open an SSH connection to the
csa2.bu.eduserver.
On Mac
Open the built-in Terminal app.
Type the following command at the command prompt: ssh username@csa2.bu.edu
Example with Aaron’s username: ssh azs@csa2.bu.edu
On Windows
You will need to install an SSH client program.
I recommend that you download/install the Putty software.
Open Putty. The default setting is fine for our purpose. In the prompt for Host
Name (or IP address), use the hostname csa2.bu.edu and click “Open”.
-
Log in by typing your BU username and Kerberos password (which will not show on the screen).
-
After you are logged in and see the unix command prompt
(the line will end with$or~or%), type the following command, and hit enter:web-ok
You will see an error message if it does not work, but no message if successful.
After your account is set up, go the main cs-people webpage and check that your name/account is set up. If not, ask for help!
The Main Event: publishing you web page
Transfer your files to the web server to get them to display on the public World-wide Web.
This task is illustrated in the example videos about publishing your web page. Use a file-transfer program (WinSCP or Fetch) to upload the files. Set the permissions accordingly, to UNIX code 755 (rwxr-xr-x). * Test by viewing your web page in the browser.
The page should be visible using this URL:
http://cs-people.bu.edu/username/ where you replace username with your
BU username.
Important Notes
- The UNIX file system is case-sensitive with respect to file names. Your image
file name and the
srcused in the image tag must agree, including the file extension..JPGand .jpgare considered different!
Task 3: Writing an HTML Form
In this task, you will create an HTML form to implement a simple survey questionnaire. The subject matter of the survey questions is entirely up to your choice. The survey must contain one or more of each of these form input elements: e.g., text box, radio buttons, check boxes, drop-down list.
Here is a sample output (in the web browser):
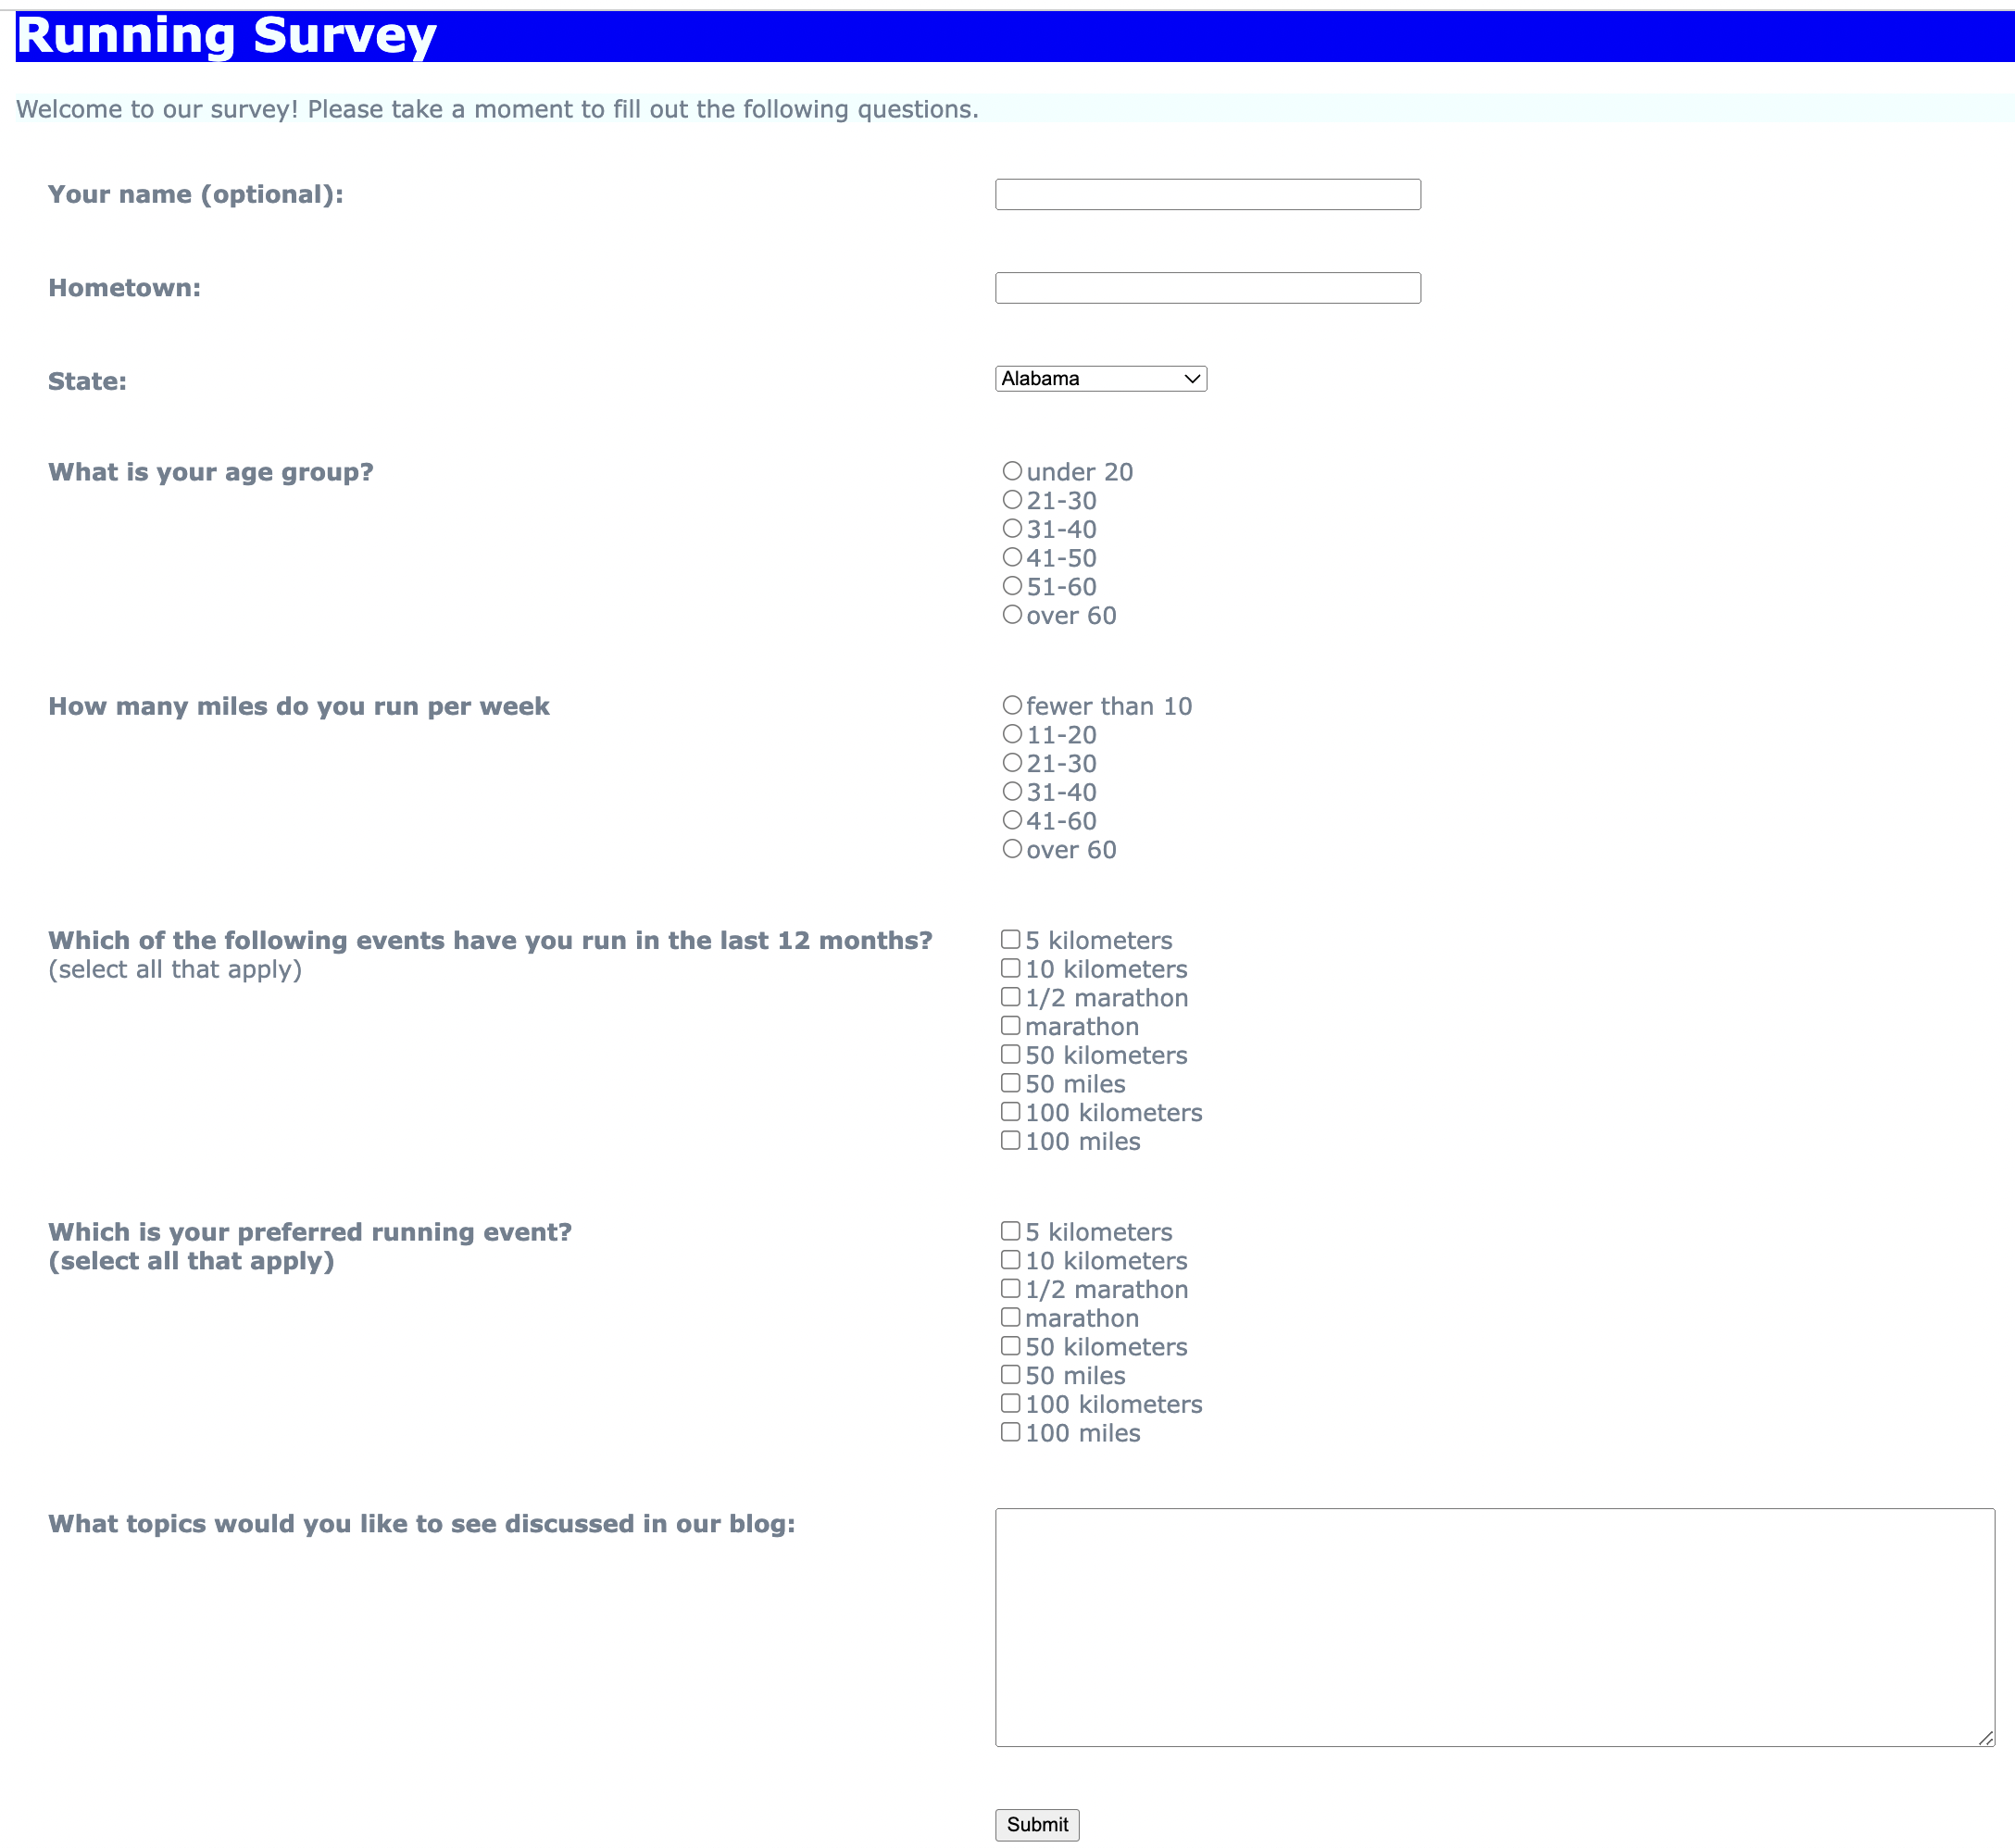
Your goal is not to reproduce this exact form, but rather to create a form on a subject that interests you.
Use VS Code to create a new HTML file, and save it with the special name survey.html.
As you develop your web page, get in the habit of including comments to explain each
major section, and make notes to explain anything that is confusing.
- Form Submission
The most challenging part of the form will be submitting the form to the server for processing. Work on this first! Create a simple form with a single text box for the respondent’s name and a submit button.
Submit your form to the web application located at:
https://cs-webapps.bu.edu/cgi-bin/util/formmailer.py
We will discuss/demonstrate the form submission in class on Thursday 9/12.
In addition to the fields described below, your form must have a submit button
(labeled “Submit”), and a hidden form field named mailto, which will contain your
email address (i.e., so that the form submission will be sent to you as an email).
- Additional Form Fields
Make sure you get part 1 to work before you begin part 2! Add some text before the form giving the user instructions and describing what the survey will do.
Your form should be neatly formatted with well-aligned cells.
Use a <table> to wrap the form fields and get them to line up neatly.
Your form must ask several survey questions (as many as you like), so long as you use all of the following form fields:
-
A text box for the respondent’s name, but make it optional
-
A text box for the respondent’s Home City/Town
-
A drop-down list for the respondent’s State (Do not type this all in! Grab the code from
http://www.freeformatter.com/usa-state-list-html-select.html) -
Two questions that use radio-buttons (i.e., a 3-5 point scale or other) to collect mutually-exclusive responses
-
Two questions that use check boxes (i.e., yes/no or true/false or select all of the following) to collect multiple-select responses
-
A text area for “additional comments” or some other free-form input from the user
-
Styling the Web page and Form
-
Continue working with your CSS file
styles.cssfrom Assignment 1. Link this style sheet into the<head>section of your HTML file. -
Use CSS elements to customize the display of the form elements with respect to fonts, sizes, margins, and padding to make the form visually appealing.
Task 4: Publishing Your Web Page (reprise)
Transfer your files to the web server to get them to display on the public World-wide Web.
This task is illustrated in the example videos about publishing your web page. Use a file-transfer program (WinSCP or Fetch) to upload the files. Set the permissions accordingly, to UNIX code 755 (rwxr-xr-x). * Test by viewing your web page in the browser.
The page should be visible using this URL:
http://cs-people.bu.edu/username/survey.html where you replace
username with your BU username.