Git Installation for Windows
Overview
These installation instructions are Windows-specific!
A Git installation script for MAC is located here.
The commands below must be done one at a time. Make sure each one is successful before continuing to the next step. Please do not get hung up on version numbers. Use the latest version for any package you install!
Git Client Installation for Windows
Git is a software version control system. It allows us to maintain multiple (historical) versions of our files, so that we can track changes and roll back to a previous version if needed. We will use the GitHub website (www.github.com) to backup our files, as well as for deploying our web applications to the public World-Wide Web.
Git uses the concept of source code repositories, or repos. A repository is a named collection of files. We will create a local (on our of computer) git repository called main. We will create a remote branch on the GitHub website called origin, to which we will push (upload) our files as a backup. When it’s time to submit your files to Gradescope, you will “pull” them from GitHub into Gradescope.
Download the installer for Git from this website:
Go to https://git-scm.com/download/win and your download should start automatically. If not, choose the appropriate install for your Windows device.
Installing Git
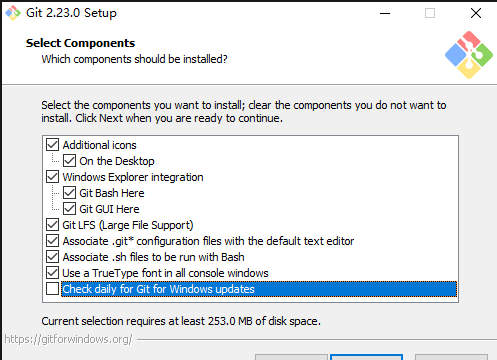
Once you download Git, the setup wizard should start. Once you get to
the ‘select components’ screen, ensure that your screen reflects the
boxes in the image below exactly. Failure to do so may lead to
complications and require you to reinstall Git later. While not
reflected in the image above, it is important to ensure Git is added toPATH (there should be a prompt for this in the setup wizard).
GitHub set up
If you do not already have an account on GitHub, go create one now.
On the www.github.com website,
create a respository (repo) called cs412.
Local set up
Create a New (local) Git Repository*
These steps will intialize your local git repository and set some configuration parameters.
You will only need to do these steps once.
# change into Django directory
cd django

# create git repository, check in files
git init
git add .
git commit -m "initialize repository"
git branch -M main


# set git congifguration parameters
git config --global user.name "Your Name"
git config --global user.email "username@bu.edu"
Connect the remote branch (from GitHub) to your local file system
Use this command to connect the remote branch to your local git branch.
When you attempt to do this, you should be prompted for a username and password.
The username is your github.com username (mine is azs-bu). Check yours.
In the password field, you must use a Personal Access Token. This is a special password
that you will generate from the github website. Follow the instructions here:
https://docs.github.com/en/authentication/keeping-your-account-and-data-secure/creating-a-personal-access-token.
Set the expiration to be at least 90 days so you do not need to change it for the
rest of the semester.
You should only need to do this once!
# add the remote branch (from github) to the local repository
# your remote hook will be different -- get it from your github account!!
git remote add origin https://github.com/azs-bu/cs412-examples.git
The first time you run this command, git will prompt for your username and password. Use your github username. When it asks for a password, you will now have to supply what’s called a personal access token (PAT) instead of a password. To generate this PAT follow the directions on the github website (they have screenshots you can follow). *Use a “Classic Token”, not a “fine-grained token”.
.gitignore
There are several files that we do not want to push to the git repository, including
python compiled/bytecode files (*.pyc), virtual environment files, cache files,
log files, as well as some static resources.
To prevent adding these to the git repository, create a plain text file in your django
directory called .gitignore. Here is the content to put into the .gitignore file:
# Python bytecode files
*.pyc
*.pyo
__pycache__/

# Virtual environment (TODO: add other virtual environment names as needed -> not necessary if using `pipenv`)
venv/
env/
.venv/
.env/

# Django environment variables
.env
.env.*

# Django migrations (temporary or backup files)
*/migrations/__pycache__/
*/migrations/*.pyc

# Database
db.sqlite3-journal

# Static and media files

# static/admin is created on the Apache-server when we create the sybmolic link
# (but is not necessary locally or on GitHub)
/static/admin/

# Django cache files
*.log
*.pot
*.mo
*.pid
*.cache
*.coverage
*.coverage.*

# Editor and IDE settings
.vscode/
.idea/
.spyderproject
.spyproject
*.sublime-project
*.sublime-workspace

# Operating system files
.DS_Store
Thumbs.db
desktop.ini

# Pipenv and Poetry
.python-version

# Coverage reports
htmlcov/
.coverage
.coverage.*
Using git command-line tools
Checking status, adding files, and committing changes
Use these commands to check the status of your repository, add files, and commit changes.
Always write a good comment when you commit changes, these will be important if (when) you need to roll back to a previous version.
# check status of repository
git status

# add all local changes to repository
git add -A

# commit changes
git commit -m 'input some useful comment here'
Push local changes to the remote branch
Use this command to push your local changes up to GitHub.
# push local changes to remote branch
git push origin main
Your will need to do this every time your commit changes!
Do you have suggestions for improving these instructions?
Please share them with Aaron.
[cs_people]: http://cs-people.bu.edu [putty]: https://www.putty.org/ [django_running]: ../resources/django_running.png [installation_mac]: